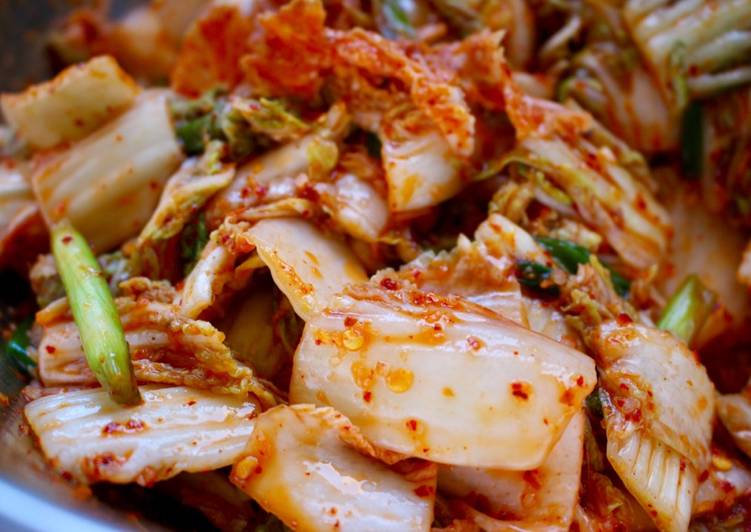
Hiya everybody, this time we gives you kimchi (easier than you think! ;) ) recipes of dishes that are straightforward to know. We are going to share with you the recipes that you’re looking for. I’ve made it many times and it is so delicious that you just guys will love it.
Kimchi (Easier than you think! ;) ) is one of the most favored of recent trending foods in the world. It is appreciated by millions every day. It is simple, it’s quick, it tastes yummy. Kimchi (Easier than you think! ;) ) is something which I have loved my entire life. They’re nice and they look fantastic.
Great recipe for Kimchi (Easier than you think! ;) ). If you're intimidated by the idea of making your own kimchi, my recipe is exact, reliable, small enough, and tasty enough that you won't regret the effort. Plus it uses what are likely more accessible ingredients - fish sauce, - crushed.
To get started with this recipe, we must prepare a few ingredients. You can have kimchi (easier than you think! ;) ) using 11 ingredients and 9 steps. Here is how you can achieve that.
The ingredients needed to make Kimchi (Easier than you think! ;) ):
- Make ready 4-5 pounds Napa cabbage, cut into roughly 1"x 2" pieces (about 30 cups of chopped raw cabbage)
- Prepare 1 bunch green onions, washed, roots trimmed, and cut into 2 inch segments
- Prepare 5 Tablespoons kosher salt (about 10% less if you're using regular table salt)
- Make ready For the paste:
- Make ready 1/4 cup minced garlic (about 5 or 6 large cloves)
- Make ready 1/4 cup minced fresh ginger root (about a 2" segment, peeled)
- Take 1/4-1/2 cup crushed red chili flakes depending on how hot you want your kimchi. See notes above re: gochugaru
- Take 1/4 cup steamed white rice, lightly packed. Short or long grain is fine. If stale, microwave with 2 Tbsp. water for 1 minute
- Make ready 1/4 cup fish sauce
- Make ready 1/4 cup sugar
- Take 1/4 cup water for blending + 1/3 cup water for rinsing seasoning from bowl (see directions below)
Chef Randy Feltis shares how to make the. I like to peel mine first with a spoon. Then you can either thinly slice, finely chop, or grate it. This makes for a fairly ginger-forward kimchi, so adjust the amount according to your preferences.
Instructions to make Kimchi (Easier than you think! ;) ):
- In a large stainless steel or mixing bowl, toss the raw cabbage, green onion, and the salt together to pre-brine the cabbage. Make sure to thoroughly incorporate the salt throughout the cabbage. In 10 to 15 minutes, you should start to see the cabbage leach liquid and wilt. Let the cabbage sit for 1.5 to 2 hours, tossing and redistributing every 30 minutes to ensure even brining.
- After at least 90 minutes of pre-brining, rinse the cabbage with enough water to cover the cabbage by 4 or 5 inches by swishing the cabbage in the water 7 or 8 times. Remove the cabbage into a strainer and let the excess water drain while you prepare the paste.
- Make the paste by putting all the paste ingredients into a blender and blend until you can't see the individual grains of rice. Pour the paste over the cabbage.
- Get into the bowl with your hands and mix the paste into the cabbage until all the pieces are evenly and thoroughly coated.
- Pack your kimchi into a clean, dry bottle or other tight-lidded container (this time I repurposed a half gallon kimchi jar) and use the last 1/3 cup of water to swish around the mixing bowl, pick up all the remaining paste, and pour that liquid on top of your kimchi. Remember to leave 2 to 3 inches of headspace at the top to allow for expansion as fermentation takes place.
- Your batch of kimchi is now ready for fermentation in a dark but not cold place like the inside of your cupboard. Or, if you can find a warmish spot in your garage, you can put it there. (I know that's not always possible for cold climate people in the middle of winter.) As it ripens, it's a good idea keep the lid slightly unscrewed to relieve the pressurization caused by fermentation. (Your jar can literally explode from the pressure on a specially active fermentation day.)
- People often ask HOW RIPE DOES THE KIMCHI HAVE TO BE BEFORE I REFRIGERATE OR EAT IT? You can eat the kimchi whenever you want. Fresh, just after it's been made, all the way up to when it's so incredibly old, ripe and stinky you could choke out a subway system by placing an open jar in one of the vents. It remains safe for human consumption for A VERY LONG TIME.
- But as to when to refrigerate, just go out once a day every day to taste a piece, and when it gets to the ripeness you like, stick it in the fridge. It'll continue to ripen, but very slowly.
- Enjoy! :)
This easy kimchi recipe is a speedy version of the traditional Korean kimchi ! Chock full of vitamins and pro-biotics, this mak kimchi is the perfect healthy side dish for any Korean meal. Good authentic homemade kimchi is much easier than you think. Making good authentic kimchi at home is much easier than you think. This list has something for everyone and every season!
Above is learn how to prepare dinner kimchi (easier than you think! ;) ), very easy to make. Do the cooking phases correctly, calm down and use your coronary heart then your cooking will be scrumptious. There are a lot of recipes that you could attempt from this website, please find what you want. When you like this recipe please share it with your pals. Glad cooking.